
Vinyl Rolls Technical
- Application information, tips and more!
ThermoFlex® Plus
Usage Instructions
- Create your design in graphics software and mirror the image in the effects menu
- Load ThermoFlex® Plus onto your plotter.
- Always test cut to ensure proper depth, speed and down force.
- Weed film from carrier that you do not want to transfer.
- Place image on the surface to which you are transferring the film
- Place a Teflon sheet between the heat platen and the polyester carrier sheet to prevent sticking and edge damage to the transferred design.
- Heat press between 330° F - 335° F for 17-20 seconds using firm even pressure.
!If ThermoFlex® Plus only partially adheres to the fabric it is usually because insufficient or uneven pressure was applied. If this happens, reposition the design, increase the pressure and repress.
Peel warm or cold. It is much easier to peel while still warm but for consistent results allow at least 10 seconds of cooling time before peeling. For greater durability, cover with a Teflon sheet and repress for 10 seconds.
Turn garment inside out before washing. Wash in warm to hot water. You can tumble dry ThermoFlex® Plus decorated garments on high heat without the transfer film sticking to itself.
ThermoFlex® Plus is very durable and if properly applied, will last for the life of the garment.
You can apply ThermoFlex® Plus to cotton, polyester, blends, Spandex, Lycra, wool and linen.
ThermoFlex® Plus will NOT adhere to nylon
ThermoFlex® Plus will adhere to itself. You can build complex designs by applying ThermoFlex® Plus in multiple layers.
ThermoFlex® Xtra
Choose ThermoFlex® Xtra for application to nylon, leather,
and other heat sensitive fabrics.
It uses a hot-melt adhesive that activates at a lower temperature than ThermoFlex® Plus
Usage Instructions
- Create your design in graphics software and mirror the image in the effects menu.
- Load ThermoFlex® Xtra onto your plotter.
- Always test cut to ensure proper depth, speed and down force
- Weed film from carrier that you do not want to transfer.
- Place image on the surface to which you are transferring the film
- Place a Teflon sheet between the heat platen and the polyester carrier sheet to prevent sticking and edge damage of the transferred design.
- Heat press between 300° F - 315° F for 3 - 5 seconds using firm even pressure.
!If ThermoFlex® Xtra only partially adheres to the fabric it is usually because insufficient or uneven pressure was applied. If this happens, reposition the design, increase the pressure and repress.
Let cool before removing the carrier sheet. Peel cool.
Cover transferred image with Teflon release sheet and reheat 10 seconds to complete cure.
Follow wash instructions for nylon. Turn inside-out, cold water, tumble dry low heat.
ThermoBANNER™2
Choose ThermoBANNER�2 for application to heat sensitive surfaces like coated canvas, nylons as well as most vinyl and plastic coated surfaces.
This vinyl applies with at a very low temperature with very little pressure and can be applied with a hand iron or a standard heat press.
Great for awnings, permanent banners, umbrellas,
Tire covers and flexible truck side coverings.
Excellent outdoor durability!
Usage Instructions
- Create your design in graphics software and mirror the image in the effects menu.
- Load ThermoBanner™2 onto your plotter.
- Always test cut to ensure proper depth, speed and down force.
- Weed film from carrier that you do not want to transfer.
- Place image on the surface to which you are transferring the vinyl.
- Place a Teflon sheet between the heat platen and the polyester carrier sheet to prevent sticking and edge damage of the transferred design.
- Heat press between 212° F – 285°F for 10 – 15 seconds using very light pressure.
- Peel cold.
ThermoFlex® Sport
Choose ThermoFlex® Sport for use with open mesh polyester athletic jersey.
It's thicker properties bridge the openings in the mesh for a smoother finish.
Usage Instructions
- Create your design in graphics software and mirror the image in the effects menu.
- Load ThermoFlex® Sport onto your plotter.
- Always test cut to ensure proper depth, speed and down force.
- Weed film from carrier that you do not want to transfer.
- Place image on the surface to which you are transferring the film
- Place a Teflon sheet between the heat platen and the polyester carrier sheet to prevent sticking and edge damage of the transferred design.
- Heat press between 300° F- 320° F for 8 - 10 seconds using firm even pressure.
!If ThermoFlex® Sport only partially adheres to the fabric it is usually because insufficient or uneven pressure was applied. If this happens, reposition the design, increase the pressure and repress.
Peel warm or cold. It is much easier to peel when still warm but for consistent results allow at least 10 seconds of cooling time before peeling.
Wash at normal settings.
Will adhere to most fabrics. Use the lower temperature and shorter dwell time when applying to Nylon.
Textile Foils
Foil creates a beautiful metallic finish.
Hotmelt Blue
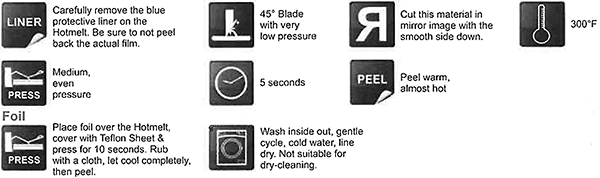
!No nylon
HotMelt Blue Application Instructions
DecoFilm™
Choose DecoFilm™ when your design calls for a bright metallic finish
Usage Instructions
- Create your design in graphics software and mirror the image in the effects menu.
- Load DecoFilm™ onto your plotter.
- Always test cut to ensure proper depth, speed and down force.
- Weed film from carrier that you do not want to transfer.
- Place image on the surface to which you are transferring the film
- Place a Teflon sheet between the heat platen and the polyester carrier sheet to prevent sticking and edge damage to the transferred design.
- Heat press between 310° F - 330° F for 10 - 15 seconds using firm even pressure.
!If DecoFilm™ only partially adheres to the fabric it is usually because insufficient or uneven pressure was applied. If this happens, reposition the design, increase the pressure and repress.
Cool completely. Peel cold.
!Remove the Mylar carrier sheet carefully. The colors on the metal foil have a tendency to peel with the backing if too much heat or dwell time is applied or the design is not completely cooled when peeled.
Cover and reheat if necessary.
Wash inside-out, cold water, gentle cycle, dry low heat.
Adheres to most fabrics.
This decorative material should be handled with care. Metallic foils will not have the stretch and rebound characteristics of some of our other heat applied materials and are not appropriate for certain applications. Discretion should be used regarding the intended use of the garment.
DecoSparkle™
DecoSparkle™ is a laminated holographic film for dazzling color reflective effects in your designs
Usage Instructions
- Create your design in graphics software and mirror the image in the effects menu.
- Load DecoSparkle™ onto your plotter.
- Always test cut to ensure proper depth, speed and down force.
- Weed film from carrier that you do not want to transfer.
- Place image on the surface to which you are transferring the film
- Place a Teflon sheet between the heat platen and the polyester carrier sheet to prevent sticking and edge damage to the transferred design.
- Heat press at 300° F for 10 - 12 seconds using firm even pressure.
!If DecoSparkle™ only partially adheres to the fabric it is usually because insufficient or uneven pressure was applied. If this happens, reposition the design, increase the pressure and repress.
Cool completely. Peel cold.
Wash inside-out, cold water, gentle cycle, tumble dry low heat.
Adheres to most fabrics.
This decorative material should be handled with care. This material does not have the stretch and rebound characteristics of some of our other heat applied materials and are not appropriate for certain applications. Discretion should be used regarding the intended use of the garment.
GlitterFlexII™
GlitterFlexII™ is a flexible polyurethane film that encapsulates small reflective polyester pieces for a glittering visual effect.
Usage Instructions
- Create your design in graphics software mirror the image in the effects menu.
- Load GlitterFlexII™ onto your plotter.
- Always test cut to ensure proper depth, speed and down force.
This material is thicker than most so it is especially important to perform a test cut before plotter cutting your final image. - Weed film from carrier that you do not want to transfer.
- Place image on the surface to which you are transferring the film
- Place a Teflon sheet between the heat platen and the polyester carrier sheet to prevent sticking and edge damage to the transferred design.
- Heat press at 330-335° F for 3 seconds using firm even pressure.
Cool completely, peel cold and carefully! Use a dull blade to help separate the image from the carrier sheet if necessary.
Cover transferred image with Teflon sheet and reheat for 10 seconds.
!If GlitterFlexII™ only partially adheres to the fabric it is usually because insufficient or uneven pressure was applied. If this happens, reposition the design and repress, but do not increase the time or temperature.
Wash inside-out, cold water, gentle cycle, tumble dry with low heat.
Apply to cotton, polyester, and blends. Will NOT adhere to nylon, dazzle cloth, shiny polyester or moisture-wicking materials.
Glitterflex Ultra
Usage Instructions
- Create your design in graphics software mirror the image in the effects menu.
- Load GlitterFlex Ultra onto your plotter.
Usage Instructions
Adheres to Cotton, Uncoated Polyester, Fabric Blends, Wool, Linen

No nylon. Be advised that dye migration has occurred with low energy dyes in
polyester and poly-blend fabrics. Please note: If material starts to separate from the carrier, smooth it back down before cutting.
Instructions for application to moisture-wicking materials:
Damp a cloth with rubbing alcohol (isopropyl alcohol), then rub it into the area on the garment you want to apply your design. Allow it to dry and apply your material. This will allow better adhesion to the garment.
Instructions for application to dazzle cloth and shiny polyester:
We highly recommend that you TEST prior to doing large runs. Coated polyester can routinely cause adhesion issues.
!If GlitterFlex Ultra only partially adheres to the fabric it is usually because insufficient or uneven pressure was applied. If this happens, reposition the design and repress, but do not increase the time or temperature.
Wild Fashion Prints
Use Wild Fashion Prints for designs that require pre-printed fashion patterns
Usage Instructions
- Create your design in graphics software and mirror the image in the effects menu
- Load Wild Fashion Prints onto your plotter.
- Always test cut to ensure proper depth, speed and down force.
- Weed film from carrier that you do not want to transfer.
- Place image on the surface to which you are transferring the film
- Place a Teflon sheet between the heat platen and the polyester carrier sheet to prevent sticking and edge damage to the transferred design.
- Heat press between 325� F - 340� F for 12 - 15 seconds using firm even pressure.
!If Wild Fashion Prints partially adhere to the fabric it is usually because insufficient or uneven pressure was applied. If this happens, reposition the design, increase the pressure and repress.
Let cool completely before removing carrier sheet. Peel cold.
Wash cold water, gentle cycle, low heat.
Wild Fashion Prints adhere to most fabrics.
This decorative material should be handled with care. It does not have the stretch and rebound characteristics of some of our other heat applied materials and are not appropriate for certain applications. Discretion should be used regarding the intended use of the garment.
Ref-Lite®
Use Ref-Lite� where nighttime reflectivity and brilliant reflective effects are desired. Also for applications that require safety grade reflectivity.
Usage Instructions
- Create your design in graphics software mirror the image in the effects menu.
- Load Ref-Lite® onto your plotter.
- Always test cut to ensure proper depth, speed and down force.
This material can be difficult to cut. Try slowing the cutting speed and use a new 60� blade. - Weed film from carrier that you do not want to transfer.
- Place image on the surface to which you are transferring the film
- Place a Teflon sheet between the heat platen and the polyester carrier sheet to prevent sticking and edge damage to the transferred design.
- Heat press between 275� F - 305� F for 3 - 5 seconds using firm even pressure.
- Cool Completely. Peel cool.
- Cover with a Teflon release sheet and press again for 5-7 seconds after peeling.
Do not use more pressure, temperature or dwell time than is recommended. The adhesive on the weeded backing may stick to fabric.
!If Ref-Lite® only partially adheres to the fabric it is usually because insufficient or uneven pressure was applied. If this happens, reposition the design and repress.
Special Instructions
!Always make one test sample. Wash test for adhesion strength and to demonstrate reflective capabilities. Always secure signed approval before beginning production.
Wash cold, dry low heat.
Adheres to most fabrics as well as many textured siliconized fabrics.
DecoFlock™
Use DecoFlock™ when your design calls for the 3-dimensional look
and the soft feel of velvet
Usage Instructions
- Create your design in graphics software and mirror the image in the effects menu.
- Load DecoFlock™ onto your plotter.
- Always test cut to ensure proper depth, speed and down force.
- Weed film from carrier that you do not want to transfer.
- Place image on the surface to which you are transferring the film
- Place a Teflon sheet between the heat platen and the polyester carrier sheet to prevent sticking and edge damage to the transferred design.
- Heat press between 310° F - 330° F for 10 - 15 seconds using firm even pressure.
!If DecoFlock™ only partially adheres to the fabric it is usually because insufficient or uneven pressure was applied. If this happens, reposition the design, increase the pressure and repress.
Allow to completely cool. Peel cold.
Can be washed and dried at medium temperatures.
Adheres to most fabrics.
ColorPrint™ Solvent Gloss
ColorPrint™ Solvent Gloss is designed for printing with solvent or eco-solvent ink jet print engines such as the Roland VersaCAMM and the Mimaki JV3.
Usage Instructions
- Create your design in graphics software
No need to mirror image. Print and cut right reading - Load ColorPrint™ Solvent Gloss onto your plotter.
- Always test cut to ensure proper depth, speed and down force.
- Use our Transfer & Seal tape (T&S 1220) or other medium tack application tape to remove the image from the paper backing and place image on the surface to which you are transferring the film.
- Place a Teflon sheet between the heat platen and the transfer medium to prevent sticking and edge damage of the transferred design.
- Heat press at 325° F for 15 seconds using firm even pressure.
!If your transfer only partially adheres to the fabric it is usually because insufficient or uneven pressure was applied. If this happens, reposition the design, increase the pressure and repress.
Peel Transfer & Seal Tape while warm, almost hot.
!To ensure greatest durability of digital prints, garments should be turned inside out and washed in cold water without bleach of any type using a gentle wash cycle. Tumble dry low heat.
Will adhere to cotton, blended fabrics, polyester fabrics, and has been successfully applied to other fabrics including nylon and spandex
Special garment fabrics should be tested prior to production. These materials contain blockers to prevent dye migration (bleed) from reactive and sub-dyed fabrics.
ColorPrint™ Solvent Frost
ColorPrint™ Solvent Frost is designed for printing with solvent or eco-solvent ink jet print engines such as the Roland VersaCAMM and the Mimaki JV3.
Usage Instructions
- Create your design in graphics software
No need to mirror image. Print and cut right reading - Load ColorPrint™ Solvent Frost onto your plotter.
- Always test cut to ensure proper depth, speed and down force.
- Use our Transfer & Seal tape (T&S 1220) or other medium tack application tape to remove the image from the paper backing and place image on the surface to which you are transferring the film.
- Place a Teflon sheet between the heat platen and the transfer medium to prevent sticking and edge damage of the transferred design.
- Heat press at 325° F for 15 seconds using firm even pressure.
!If your transfer only partially adheres to the fabric it is usually because insufficient or uneven pressure was applied. If this happens, reposition the design, increase the pressure and repress.
Peel Transfer & Seal Tape while warm, almost hot.
!To ensure greatest durability of digital prints, garments should be turned inside out and washed in cold water without bleach of any type using a gentle wash cycle. Tumble dry low heat.
Will adhere to cotton, blended fabrics, polyester fabrics, and has been successfully applied to other fabrics including nylon and spandex
Special garment fabrics should be tested prior to production. These materials contain blockers to prevent dye migration (bleed) from reactive and sub-dyed fabrics.
ColorPrint™ Solvent Silver
ColorPrint™ Solvent Silver is designed for printing with solvent or eco-solvent ink jet print engines such as the Roland VersaCAMM and the Mimaki JV3.
Usage Instructions
- Create your design in graphics software
No need to mirror image. Print and cut right reading - Load ColorPrint™ Solvent Silver onto your plotter.
- Always test cut to ensure proper depth, speed and down force.
- Use our Transfer & Seal tape (T&S 1220) or other medium tack application tape to remove the image from the paper backing and place image on the surface to which you are transferring the film.
- Place a Teflon sheet between the heat platen and the transfer medium to prevent sticking and edge damage of the transferred design.
- Heat press at 325° F for 15 seconds using firm even pressure.
!If your transfer only partially adheres to the fabric it is usually because insufficient or uneven pressure was applied. If this happens, reposition the design, increase the pressure and repress.
Peel Transfer & Seal Tape while warm, almost hot.
!To ensure greatest durability of digital prints, garments should be turned inside out and washed in cold water without bleach of any type using a gentle wash cycle. Tumble dry low heat.
Will adhere to cotton, blended fabrics, polyester fabrics, and has been successfully applied to other fabrics including nylon and spandex
Special garment fabrics should be tested prior to production. These materials contain blockers to prevent dye migration (bleed) from reactive and sub-dyed fabrics.
ColorPrint™ Solvent Leather
ColorPrint™ Solvent Leather is designed for printing with solvent or eco-solvent ink jet print engines such as the Roland VersaCAMM and the Mimaki JV3.
Specially designed to adhere to leather, vinyl and other low temperature substrates
Usage Instructions
- Create your design in graphics software
No need to mirror image. Print and cut right reading - Load ColorPrint™ Solvent Leather onto your plotter.
- Always test cut to ensure proper depth, speed and down force.
- Use our Transfer & Seal tape (T&S 1220) or other medium tack application tape to remove the image from the paper backing and place image on the surface to which you are transferring the film.
- Place a Teflon sheet between the heat platen and the transfer medium to prevent sticking and edge damage of the transferred design.
- Heat press at 180° F - 200° F for 10 - 15 seconds using firm even pressure.
!If your transfer only partially adheres to the fabric it is usually because insufficient or uneven pressure was applied. If this happens, reposition the design, increase the pressure and repress.
Peel Transfer & Seal Tape while warm, almost hot.
!To ensure greatest durability of digital prints, garments should be turned inside out and washed in cold water without bleach of any type using a gentle wash cycle. Tumble dry low heat.
Special garment fabrics should be tested prior to production. These materials contain blockers to prevent dye migration (bleed) from reactive and sub-dyed fabrics.
Tips and Tricks
Tricks of the Trade from those in the know
I found that pressure is very important in getting this stuff to stick really good. Years ago I was using a clam-shell model press that only had a knob adjuster for the pressure when I heard about the dollar bill test. Put a dollar bill half out of the press and close the top. If you can pull the dollar out then you don't have enough pressure. Turn the knob until you can't budge the dollar bill using all your might.
Proper cutting speed and down force are essential to the use of these products. When proper cutting speed and down force are used, they are very easy to weed and the designs will come out to best quality. It is very important to always perform a small test cut before beginning production as your blade could have dulled from the last time you used it and will not work with the same settings it did before.
Sometimes you need to apply Thermoflex Extra or Ref-Lite to nylon that's been treated for waterproofing. Some of these treatments will make material partially adhere or not adhere at all. A really good way around this problem is to keep some rubbing alcohol handy. When you encounter this problem (or think you are going to) swab the area you will be applying the material to with alcohol, let it dry, and then do your application. The alcohol removes or weakens the treatment, allowing the adhesive to better bond with the garment.
All technical information and recommendations are based on tests we believe to be reliable. We cannot guarantee performance for conditions not under our control. Before using please read our product descriptions and instructions to determine the suitability of each product for your intended use. The user assumes all risk and liability in connection with their use. It is always wise to test the materials prior to making a production run.